Setup assistants can be a great tool when you need to guide users through a series of steps.
TESetupAssistant was born during my work on the 2.0 update to Espionage, when I discovered that many of its UI elements could stand to benefit from a generic setup assistant class.
The gallery below shows some of the places in Espionage where we use TESetupAssisant, illustrating its versatility:
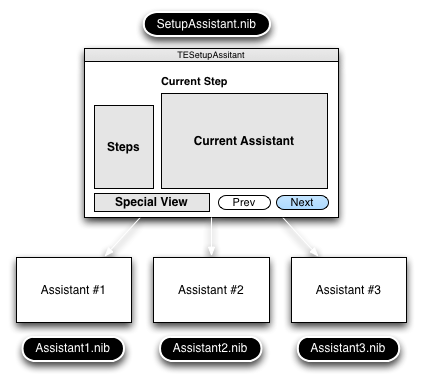
You can create these sorts of UIs very quickly and use them wherever the user needs to complete a series of steps, or even a single step (as shown in the first image above). Here’s a basic overview of it:

There are two main classes: TESetupAssistant and TEBaseAssistant. TESetupAssistant is associated with a nib file that determines the overall layout. It manages a one or more assistants, each of which inherit from TEBaseAssistant. Each TEBaseAssistant subclass has its own nib file, usually just containing a single NSView container object.
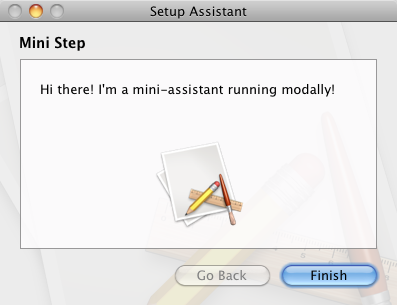
Example of a Modal Assistant
Here’s an example of a very simple assistant using the minified UI and running modally:

And here is all the code needed to create it:
// To run it modally is just 4 lines of code (somewhere):
TESetupAssistant *sa = ;
;
;
;
Notice that we don’t even need to load the nib file. That’s because our nib file is named after our assitant (MiniAssistant.nib). You can of course override the -assistantNib method to specify a different one, but that illustrates one key aspect of TESetupAssistant, and that is that there are sensible defaults for almost everything, allowing you to quickly throw together these kinds of interfaces.
Get It On Github
I’m releasing TESetupAssistant as open source under a liberal license (just an attribution is asked for), and I’ve included a little demo app to help you hit the ground running. You can download it on github.
If you use it in your application I’d love to know! Shoot us an email or post a comment below and I’ll place a link here to your app.
Enjoy! ![]()
You can follow me on twitter here.


